- Simulating Botox and Fillers
- Using Injection Points
- Customizing the Injection Color Points
- Moving Injection Points for Precision
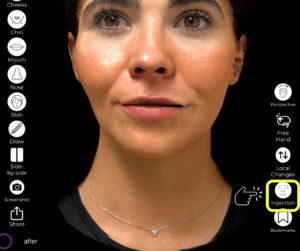
- Opening the Planning Tool for Injections
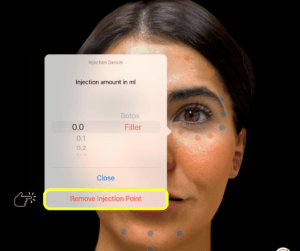
- Removing Unnecessary Injection Dots
- Choosing Between Filler and Botox for Each Injection Dot
- Selecting the Injection Filler Amount in ml
- Conclusion
Arbrea Face provides a powerful Annotation Tool for Botox and filler simulations, enabling plastic surgeons to plan, customize, and visualize injectable treatments with precision. This feature enhances patient consultations by offering real-time injection mapping, dosage adjustments, and before-and-after comparisons.
Simulating Botox and Fillers #
- Open Arbrea Face and select the patient’s case.
- Navigate to the Injectables Simulation Tool to begin mapping the injection plan.
- Choose between Botox or dermal fillers depending on the treatment area.
Why It’s Important?
- Allows for precise simulation of injectable procedures.
- Helps patients visualize treatment outcomes before the procedure.
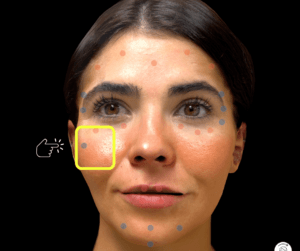
Using Injection Points #
- Select the area where the injection will be applied.
- The tool will automatically place an injection dot on the targeted region.
- Multiple injection points can be added to create a comprehensive treatment plan.

Advantage:
- Customizable injection mapping for different treatment areas.
- Helps surgeons plan dosage distribution efficiently.
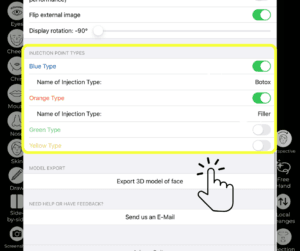
Customizing the Injection Color Points #
- Each injection type (Botox or Filler) has a color-coded point system.
- Customize the color of injection dots to differentiate treatment types.
- Adjust transparency or size for clearer visualization.
Why This Matters?
- Provides better organization and clarity when treating multiple areas.
- Allows for easy identification of injection sites during the consultation.
Moving Injection Points for Precision #
- If an injection point is incorrectly placed, simply drag and reposition it.
- Ensure that dots align with muscle structure or volume enhancement areas.
Benefit:
- Enables precise placement adjustments for more accurate simulations.
Opening the Planning Tool for Injections #
- Click on the Planning Tool to access detailed treatment options.
- Add notes, dosage information, and injection techniques.
- Save the treatment plan for future reference.

Advantage:
- Allows surgeons to document and refine treatment strategies.
- Creates a structured visual roadmap for injectables.
Removing Unnecessary Injection Dots #
- If a placement needs adjustment, simply select and delete the injection dot.
- This ensures a cleaner, more accurate simulation.
Why It’s Useful?
- Quick corrections and refinements can be made in real-time.
Choosing Between Filler and Botox for Each Injection Dot #
- Each injection point can be assigned as either Botox or filler.
- Adjust the selection to match the treatment area and intended outcome.
Benefit:
- Allows for a detailed and tailored treatment simulation.
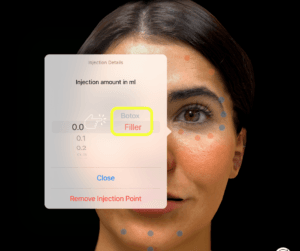
Selecting the Injection Filler Amount in ml #
- Click on the injection dot and input the desired filler volume in milliliters.
- Adjust dosage based on treatment goals and patient anatomy.

Why This Matters?
- Helps patients understand the required filler volume before treatment.
- Assists surgeons in precisely planning injections.
Conclusion #
The Annotation Tool for Injectables in Arbrea Face simplifies Botox and filler treatment planning with customizable injection points, dosage adjustments, and real-time simulations. By utilizing color-coded markers, precise placement controls, and interactive treatment planning, surgeons can enhance consultations and achieve accurate pre-procedure planning.
For more guidance, watch the full video tutorial below.


Responses